NO IT DOESN'T.
Facebook makes a mess of the clarity of images, we know that. Its compression settings are pretty strong, and it plays havoc with our sharpening, in particular. Nothing we can do about that. With all the billions and gazillions of images on their servers, can you blame them for compressing them a bit? Of course not.
But it doesn't change colour. If you see that your images' colour looks different on Facebook than it did in your editing program, it's your fault, not Facebook's. It's because you're not using the right browser.
Let's discuss the four main browsers. We'll start at the bottom of the pile, with Internet Explorer and Google Chrome. These two have no colour management at all.
(There have been announcements about colour-management features for both of them, but I can't get them to work, and all my googling hasn't yet found me proper instructions to do so. If anybody knows how to turn on colour management in either Chrome or IE, please let me know.)
If you're browsing in Chrome or IE, you just don't see correct colours. End of story. Even if you have a properly calibrated monitor, those two programs still don't honour colour profiles. If Chrome or IE are your favourite web browsers for whatever reason, that's great - keep using them for most things. But do NOT offer critique to anybody about the colour of their images in them; or you'll end up embarrassing yourself.
Next up the ladder is Safari. Safari is colour-managed ... almost. It honours the embedded colour profiles in images, and shows them accurately. Wonderful! Safari is a great option for most of your colour-critical web browsing.
But Safari has one little quirk. For images on websites which don't have colour profiles embedded, it doesn't attempt to colour-manage them at all. It just shows them however your monitor wishes. In other words, it displays them the same way Chrome and IE do.
All photographers should know that it's vitally important to save their web images with the ICC profile embedded. (Best practice for web photos) But not everyone has got the message yet, so some people still save "untagged". If you're viewing those images, Safari will show them wrong.
More relevant to this thread is the issue of Facebook's thumbnails. Facebook shows large versions of photos with the ICC profile embedded, but not the thumbnails. I'm sure the Safari users among you have noticed that the small photo you see in the newsfeed is a different colour than the large photo you see when you click on it.
So, if you're a Safari user, never offer CC on the colour of a photo just by looking at the thumbnail. Make sure you view the full-sized file.
At the top of the browser ladder is Firefox. Now, I know some people have speed issues with Firefox - I have no advice to offer in that regard. It's always run really fast for me. In this article I'm just talking about colour. And it's the king of colour.
However, I need to make something very clear: At its default settings, Firefox behaves the same as Safari. That is, it shows tagged images correctly, but untagged images incorrectly. Once you make a simple setting change, it then assumes that untagged images are in the sRGB colour space, and therefore gets them right nearly all of the time. (Obviously in cases where somebody has foolishly uploaded an Adobe RGB or ProPhoto RGB image without the ICC profile embedded, Firefox won't show it correctly. Fortunately that doesn't happen often.)
If you're a Firefox user, but haven't changed the colour management settings, you'll observe the same issue that Safari users see - the thumbnails on Facebook don't match the large images.
Time to rectify that! Here goes.
1. Launch Firefox, and type "about:config" in the address bar:

2. Say you'll be careful:

3. Type "color" in the Filter field:

4. Double-click the color_management.mode line:

5. Its default setting is 2. Change it to 1, and press OK:

The next bit is optional. I don't know how much difference it makes, to be honest. Ignore it if you want. But this is what I do (to make Firefox completely match Photoshop).
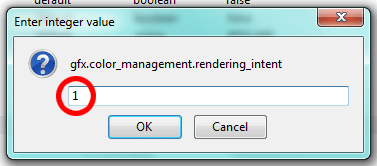
6. Double-click the rendering intent line:

7. Change it from 0 to 1 and press OK:
8. Restart Firefox.
That's all there is to it! Now, your Facebook browsing will be completely and utterly colour-managed.
As always, visit me at Ask Damien if you have any questions or problems with these instructions.