Monday, October 26, 2015

Noise removal and sharpening - the leap of faith

Pretty much everything I teach is instantaneous, you know?  You try it, and see the results right away.  That's what we love about digital, I guess.

But there's one thing I teach - again and again and again - whose benefits can't be seen immediately, and for that reason it freaks people out.  I'm talking about proper noise removal.

So many times people say to me: "I can't remove all the noise, because the photo looks plastic."

And every time I respond: "Be MUCH more afraid of noise than plasticity."

The reason is sharpening.  While noise exists in a photo, you can't sharpen it properly.  Once noise is removed, no matter how soft you think the photo looks, it can be sharpened as aggressively as you like, and the results are STUNNING.  Way beyond your wildest dreams.

I know you don't believe me, and I can't blame you.  All I can ask is for you to trust me.  If I've proven my worth to you in other matters of editing, allow me to prove it here as well.  Remove ALL the noise from your photos, and once you've taken the sharpening class, you'll be blown away at how amazing your prints look.

This quote from Marny says it all:

Ok, Damien, you've sold me. I was reaaaaaaaaally skeptical of your methods after I had to add a ridiculous amount on the luminance slider to some photos in order to eradicate every single speck of noise before sharpening. They looked SO hideous and soft and mushy on screen I just couldn't imagine that they were going to print well at all. But I sharpened them and put in my order.

I just received them today and they. look. INCREDIBLE. The skin texture that looked like plastic on screen is perfect after the slight sharpening noise and the very subtle texture of the print. And even after adding up to +70 luminance to some of them they are actually sharper and more detailed than previous photos I had printed unsharpened.

I'm blown away. I've been staring at these for like 10 minutes because they're just so stunning!
None of the above is meant to suggest that you have nothing to fear from noisy images.  Of course you must make every effort to light your photos really well, in order to use low ISOs and prevent underexposure.  Clean images still print the best.

What I want you to understand is that if you haven't been able to prevent noise when taking your photo,  your best chance of making it look good is to remove all the noise, no matter what.

Friday, October 23, 2015

Correcting eyes distorted by glasses

Thick glasses can make people's eyes look small, and sometimes it's nice and flattering to be able to correct this. Usually, it's quite simple.

Note: This method is demonstrated in Photoshop.  It's almost the same in Elements, but there is one little step that can't be performed.  I'll mention them along the way.  By the way, many thanks to Pam Frechette for her permission to use the image segment in this demonstration.

Here's the photo.  See how the glasses have shrunk the face inwards?


Friday, September 4, 2015

Black boxes and other weird behaviour in Photoshop

Since Photoshop CS6 was launched, and subsequently Photoshop CC, we've seen many complaints of weird visual behaviour of the interface.  Here are two scenarios, and possible fixes:

PROBLEM 1: BLACK BOXES ETC

Black boxes that appear and disappear randomly on your images, something like this:


Not only black boxes, though.  Sometimes white boxes, or weird blue colours in the Liquify screen, or image disappearing when you draw a crop marquee, etc.  Annoying stuff. Never problems with the image itself, just with the way it's displayed.

SOLUTION A:  Go to Edit>Preferences>Performance, and click on the "Advanced" button. Change the Drawing Mode to Basic, then restart Photoshop.  In fact, restart your whole computer if you haven't done so recently.

SOLUTION B:  If Solution A doesn't work, go back to Edit>Preferences>Performance, and uncheck the "Graphics Processor" checkbox to turn it off altogether, then restart Photoshop again.

PROBLEM 2: TERRIBLE GRAIN
When your photos look awfully grainy or noisy, but when you zoom in to 100% it goes away.

SOLUTION:  Go to Edit>Preferences>Performance, and check your Cache Levels.  You'll find they're on 1 or maybe 2.  Change them to 4, then restart Photoshop (or your whole computer if you haven't done so for a while):


DESPERATION:

If none of the above solutions work for your issue, fill this out then post the results in Ask Damien, along with a description of your issue, or better still a screenshot to demonstrate it.
 

Thursday, August 27, 2015

About JPEG file size

Redirecting ...

Sunday, August 23, 2015

Simple but important reminder

While you're transferring photos from your card to your computer (whether by cable or card reader*), DON'T DO ANYTHING ELSE ON YOUR COMPUTER.


Not only must you avoid any processor-intensive work such as editing, don't even check your emails or browse Facebook.  NOTHING.  Allow your computer to concentrate solely on the most important task in the world right at that moment - getting your files safely onto your hard drive.

Likewise, when you're backing up your photos to your external drives, or your cloud, or wherever.  Those periods of transfer are SO critical.  If any interruption causes corruption to your files, you might not find out until much later, after you no longer have the original files to fall back on.

Some of you will think that I'm making an unnecessarily big deal about this.  Many of you, in fact, will profess to frequently browsing the web while copying files, and you'll boast that you've never had corruption.  That doesn't mean you're smart, or invincible, it means you're LUCKY.  And luck always runs out, eventually.  When you are mourning the loss of some important photos, believe me, catching up on your friends' news won't seem that important after all.

There's a very important aspect to this which I must discuss.  Many times on forums people post that they've found a corrupted file or files in their set.  Many other people are very quick to say "Oh, your card is corrupted, get a new one."

I've often wondered how many perfectly good cards have been discarded for no reason.  You see, if you find a corrupted file on your computer, there's a very good chance that the corruption happened during the transfer, because you couldn't leave your computer alone for a few minutes.  There's a very good chance that the file on the card was perfectly fine.

So in these online discussions, my first question to the poster is always "Do you still have the files on the card?"  If we're lucky, they still do; in which case they can try copying them across again, and checking if the corruption is still present.  Quite often, I'm pleased to say, it's not.  This is a great outcome - we've got the photo back, and a card wasn't victimised and discarded unnecessarily.

But sadly, often the poster has already formatted the card, and used it again. This sucks, because then we don't know, you see?  We don't know if the problem was the transfer, or if the card itself is truly faulty.  That, of course, means people remain nervous every time they use that card in the future.

So leave your computer alone while files are transferring.  Just chill out.  Make a cup of tea or something.  Don't risk it.

In addition to this, of course observe normal computing common sense.  Shut it down or restart it regularly.  Keep the hard drive at least 1/3rd empty at all times.  And run maintenance software regularly (see the bottom of this page).

*Please don't use a cable.  Always a card reader.

Wednesday, August 19, 2015

Fixing tan lines

This is a very easy method to keep in mind for photos like this one, where tan lines are evident:


(This tutorial deals with darkening the too-white areas to match the tan.  If you want to lighten the tanned areas, The Handyman Method should work satisfactorily.)

This method works in both Photoshop and Elements.  Start by adding a Photo Filter adjustment layer, and increase the Density slider all the way to 100, and turn off "Preserve Luminosity".  The default Warming Filter 85 is usually fine as a starting point:


This will make the whole photo look hideously orange, of course, so invert the mask to hide the effect:


Then start painting on the mask with a very low opacity brush, until the skin is as dark as the other skin around it.  The colour might not be perfect yet, but that's ok - just concentrate on the darkness:


Here's what my mask looked like for this photo:


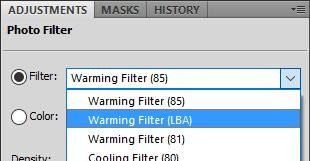
Once the darkness is good, turn your attention to the colour.  If Warming Filter (85) doesn't look perfect to you, try changing to each of the other Warming filters. You can also try the Orange one further down the list:


If none of those are perfect either, don't panic.  Just choose the "Color" option, and click on the orange square to open the Color Picker:


In the Color Picker, I usually find the H value is most important.  I simply click in that field, then use the wheel of my mouse to take the number up or down, while watching the photo.  For this photo, I found that a Hue of 24 was identical to the surrounding skin:


(Sometimes it's also necessary to fiddle with the S and B values to get your perfect result.)

Here's my outcome. Pretty good, eh?  And so simple.  Nobody would ever know.


For really complex situations, it is sometimes necessary to follow the Photo Filter with some additional touch-ups using The Handyman Method.  Not very often, though.

Needless to say, if all this talk of layers and masking is foreign to you, I beg you to consider my little Layers & Masks Class.  For a tiny fee, it will open up a whole world of editing skills to you.

Monday, July 27, 2015

Buying a Mac or a PC


I love the fist pump baby. He makes me laugh every time. But I'm not posting this for LOLs. I think this is a genuine conversation that needs to be had.

We've all been told many times that Macs are THE computers for the photographic industry. Mac evangelists will tell you that they are SO good that they're worth the considerably larger price tag. Many will tell you that they had a PC that crapped out after two years, but their Mac is still going strong after five years.

Let's assume for a moment that this is true. (It's not true, but let's pretend that it is for the sake of discussion.) Let's also assume that you, the potential computer purchaser, are (a) not exceedingly wealthy, and (b) do not yet own all your other dream gear - that sweet prime lens, that beautiful studio lighting kit, heck, even that amazing mentoring session with that famous photographer in another state.

Thursday, July 16, 2015

Mangled watermarks on Facebook

Occasionally people complain to me that their logo goes all blocky and unclear when it's used as a watermark on their photos on Facebook.  On further enquiry, I generally find that this happens with logos of very vivid colours, or plain logos placed onto areas of very vivid colour on the photo.

Yes, this is because of the aggressive jpeg compression that Facebook applies to our photos, which photographers are always eager to complain about at any opportunity.  As I've insisted in the past, we can't blame Facebook for doing this.

Jpeg compression is not Facebook's creation, though. It was devised many years beforehand.  And it is the nature of jpeg compression that very pure primary colours get degraded more than most.  I don't understand how it works, and it's not important that you do either.  We must simply accept that it is so, and find ways to manage it.

Blue or green screen for background replacement?

If you're taking photos on which you intend to change or replace the background, you might think that a blue or green screen would be best to shoot against.  That's the "traditional" way, right?  But actually, it's a bad idea.  That colour bleeds into hair, and around edges, and it's a replacement nightmare.

This is the order of your options:

BEST: Shoot against the actual colour you want in the photo - no editing necessary.

NEXT BEST: Shoot against a colour which is very similar to the colour you eventually want - minimal editing necessary.

MIGHT BE OK: Shoot against a dark neutral colour if your subject has light hair, or a light neutral colour if your subject has dark hair - the natural contrast will help you replace the colour in editing, but can still be tricky.  (Example)

BAD: Shoot against green or blue (or any other bright colour, really).

VERY BAD: Shoot against a mixed/busy background.

Tuesday, July 14, 2015

Creamy / silky / perfect / angelic skin

This question is asked a lot.  "How can I get that creamy skin?"   There are a few very important aspects to consider:

1. Understand that you're comparing somebody's web-size image with your full-size one

Photos always look better on the internet, especially when you know exactly how to do it right (size, format, sharpening).  Don't make the mistake of looking at skin in somebody else's photo at its small web size, then at your own photo at full zoom - that'll drive you batty.  Be reasonable.

Be especially aware that skilful web sharpening, which makes eyes and hair razor sharp but leaves skin alone, enhances the illusion of "creaminess" of skin.

2. Understand that you're looking at the end result of somebody's hard work

Don't upload your photos straight from the camera, and immediately throw up your hands because the skin ain't creamy.  Quality takes skill, time and effort.

Smart Objects: What they're for, and what they're NOT.

For the last few versions of Photoshop and Lightroom (not Elements), there has existed the ability to open photos from raw to Photoshop as Smart Objects.


If you do this, the base layer appears as the filename, instead of the usual "Background":


If you have opened a raw file this way, you can double-click the layer to return to the raw program and make further edits.  There are a lot of people who use Smart Objects religiously, because of this "go-back-ability".  And at face value, it seems like useful functionality, right?

WRONG.

Monday, July 6, 2015

Order of layers for complex pixel edits.

I've written a great deal in the past about non-destructive editing, and its importance for a sensible Photoshop workflow.  In essence, all adjustment layers go on top, and pixel layers at the bottom.  This is because pixel layers block out any layers beneath them, rendering them un-re-editable (ok, not a real word, I know!)

Mostly, when I've discussed pixel layers in this context, I've concentrated on cloning.  But pixel edits can take many forms:
Let's get one out of the way right now.  Noise reduction must be done in your raw program. If you've left it to Photoshop, you've left it too late.  Go back and fix it.

Perspective correction can sometimes be done in raw.  Do it there if you can, but don't worry if you can't, because you can do it with wonderful precision in Photoshop.  Straightening can be done in raw, but I don't recommend it, because it automatically crops some pixels away, and you might need those later.

The critical thing you need to understand about pixel editing is that each layer hides the previous one, thereby preventing it from being readjusted later.  So it's vital that each step is perfect before moving to the next one.  Let's examine a hypothetical nightmare photo that needs all five types of pixel editing.

Sunday, July 5, 2015

Selling digital files? You can't limit print size

These are examples of a type of frequently asked question in photography circles:

  • "What size do I need to make my digital files so the client can't print them bigger than 5x7?"
  • "My contract allows clients to print their own photos up to 8x10, and they have to come to me for anything bigger.  How do I prepare my files?"

The blunt answer is: YOU CAN'T LIMIT PRINT SIZE.

If clients feel like printing bigger, they will. And they won't care how awful the quality is.  And yes, if you've reduced your file size, the quality will be awful.

Even if you have it sternly written in your contract, they probably won't even read it.  This is the age of digital promiscuity - nobody respects the T&Cs that accompany anything digital.

Your only chance of enforcing it is if you have Mafia or Biker Club connections, and can send somebody around with a tyre iron to kneecap your clients who disobey the contract.  Let's face it, not many of us have those connections, and anyway, it's probably not good for business.

So even if you do have a print size clause in your contract, don't reduce the size of your files.  It's not worth the risk.  If your client does break the rule and prints big, the best you can hope for is that it looks great, and their friends see it and book you for sessions.

If you haven't done so already, please read my vital information about selling digital images.

Here's another, slightly different, question:
  • "I'm selling web sized files to the client, but they're not allowed to print them. How do I prepare them?"
As already discussed, sizing won't stop printing.  However, watermarking will.  Go ahead and prepare the images at web size (suggest 720 or 960, the standard Facebook sizes) and WATERMARK THEM.  Put your logo on there prominently.

When I say "prominently", I don't mean it has to be bright and in-your-face.  It can be light and subtle, but it must be in a prominent position that can't be cropped out, or easily edited out.  Over part of their body, or whatever.

If you have Photoshop (not Elements, sorry) do yourself a favour and check out my watermarking action set.  It'll speed up your workflow a LOT.

Wednesday, June 24, 2015

A fix for glowing backlit ears

Backlit photos can look lovely if done well, but this is always a risk, isn't it?


Ears are so thin, the sun can go straight through them, and they glow like crazy.  Thanks to Angela Beransky for allowing me to use her lovely backlit photo for this demonstration.

Sunday, June 14, 2015

The wonderful Dust & Scratches filter

The Dust & Scratches filter (in Photoshop and Elements) is amazing.  Such a simple tool, yet capable of so much magic.

I use it most of all for, yes, dust and scratches, on the historic photos I restore.  It saves me a LOT of time, to clean up little specks in an instant which I would otherwise have to laboriously clone or heal one at a time.

But it's not just for old photos.  Gosh no.  It's becoming famous in Ask Damien for regularly kicking Frequency Separation's ass for all sorts of skin issues - spots and pores and flakes.  It's also brilliant for removing lint from clothing.  Basically, any problem that involves very small detail.

My thanks to Amanda Kitto for allowing me to use this close-up for this demonstration:


She asked me how to remove the little milk spots from the nose.  Dust & Scratches makes it dead easy ...

Wednesday, April 1, 2015

The "Handyman" method

Just as it's nice to have a handyman in the family who can fix leaky taps, change lightbulbs, paint the fence, and various other odd jobs that arise around the house; it's also nice to have a handy editing method that can take care of all sorts of little image problems when you need it.

The following method is not fancy, nor is it difficult (though it does require a little patience).  It's the kind of method which you might not need for six months, then suddenly need for three photos in a row.  Learn it, and keep it in the back of your mind forever.  You never know when it will be handy for skin problems, shadow problems, clothing problems, etc.  It works exactly the same in both Photoshop and Elements.

For this demonstration, George Azmy has kindly allowed me to use this small section of a photograph he took.  A lovely photo, but a slightly unflattering view of the subject's armpit, I'm sure you'll agree:


The "Handyman Method" involves two stages - first, a dodge and burn stage, followed by a colour fix stage.

Wednesday, February 18, 2015

Moiré

Have you ever opened a photo and been startled to see weird patterns in striped clothing, like this?


Or even worse, this?


Comments or Questions?

If you have anything to add or ask about this article, please visit me at my Ask Damien page.