Monday, June 28, 2010
A rant about camera manufacturers
There's a school of thought, to which I mildly subscribe, that six megapixels is easily enough for most needs. (Google "6 megapixels" and have a look at some of the articles.) The truth is, a well-taken photo out of a six megapixel camera can be printed to just about any size, for just about any purpose. In the early days of digital, pros had 3MP cameras, and printed billboards from them.
If you really nail your composition, lighting, focus, etc, you can produce a masterpiece from a 6MP camera. On the flip side, if you mess up a shot, all the pixels in the world won't save you - it's still a messed-up shot. It's simply a messed up shot that's wasting more space on your card.
Of course, you can't find 6MP DSLRs any more. There's nothing below 10MP, and plenty pushing 20MP and beyond. And I think this is an appalling state of affairs.
Can you imagine, for a moment, what would have happened if camera manufacturers hadn't devoted so much R&D to putting more pixels on their cameras' sensors; but instead concentrated on making the quality output of the pixels better?
It's only been in the last year or so (with the release of the 5DII and the D700) that great strides have been made in image quality at high ISOs. In my opinion, the years between the beginning of this decade (when 6MP DSLRs were first released) and the end of the decade (when ISO advancements have been made) have been miserably wasted. If the manufacturers had forgotten about the number of pixels, and focused on their quality, we might now have cameras that would be utterly noise free, even at incredibly high ISOs. That would be wonderful.
But it's all marketing, isn't it? Bigger numbers sell more units. I'm sure there are plenty of us who yearn for Canon to release a camera with the capacity of the 10D, but the IQ of the 5DII (how good would that be???) but it ain't gonna happen. Because most cashed-up enthusiasts think that more pixels must be better; and Canon wants to take those people's money.
Wednesday, June 16, 2010
FAQ: "Help! My Raw files won't open!"
Sometimes, when timid Jpeg shooters take the leap and shoot in Raw format, they find that they can't open their Raw files, or even view them.
And other times, experienced Raw shooters upgrade their camera, then are startled to find they can't edit their first batch of Raw files.
"Help!!"
In almost all cases, this is because your camera is newer than your version of Photoshop. At the time of releasing a version of Photoshop, Adobe includes support for Raw files from all cameras which have been manufactured to that date. Then, as time goes by, they release updates to support newer cameras. Once they release a new version of Photoshop, they stop updating the previous version.
Sunday, June 13, 2010
Adding a plain background
The lovely Sara W asked how she could blur the backdrop on this photo to disguise the texture and wrinkles:
 Sara, sorry it's taken me so long to address this.
If you really want to blur it, then you'll need to follow the cloning/blurring method in the Fake depth-of-field method I described recently.
However, for something like this, I find it easier to simply replace the background with a plain colour.
 Sara, sorry it's taken me so long to address this.
If you really want to blur it, then you'll need to follow the cloning/blurring method in the Fake depth-of-field method I described recently.
However, for something like this, I find it easier to simply replace the background with a plain colour.
Wednesday, June 9, 2010
Blurring a background (false DOF)
Every now and then we realise that a photo would have been nicer with a shallower depth of field. What to do?
I want to start by making something very clear - nothing you can do in Photoshop is as good as getting it right in camera. If at all possible, go back and take the shot again, with a wider aperture.
However, here is the method for achieving something vaguely satisfactory in Photoshop.
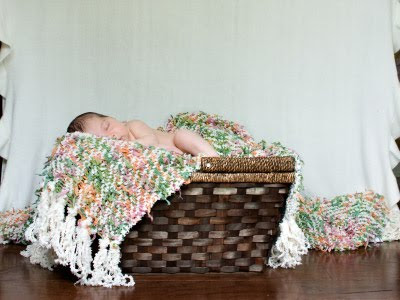
Thanks to Cristal for her permission to use this photo. It's beautiful, but she'd like the blanket blurred a bit.

Monday, June 7, 2010
Minimising soft shadows
Back in March I showed a method for softening hard-edged shadows. It's a terrible job, but unavoidable sometimes. Hard-edged shadows are cast by something very close to the subject - a hat, or whatever.
This time, we'll take a look at another shadow problem, but not so severe. Soft-edged shadows are cast by something a bit further away, and are a little easier to fix. I want to state right up front that this is not a magic 100% fix. The goal is simply to lessen the strength of the shadow areas, so they are not so offensive.
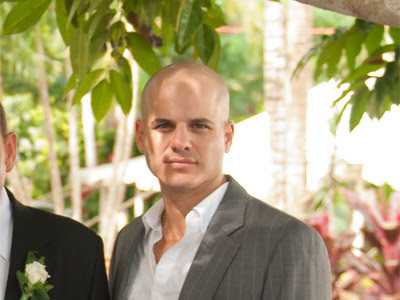
Here's a wedding party photo taken under trees. Most of the subjects escaped the dappled shadows, but this guy on the end was right in harm's way.

For something like this to be fixable, make sure you don't have any channel clipping in the skin! I can't stress this enough. Process the Raw photo a little underexposed if you have to, but just make sure you avoid any skin blowouts.
This time, we'll take a look at another shadow problem, but not so severe. Soft-edged shadows are cast by something a bit further away, and are a little easier to fix. I want to state right up front that this is not a magic 100% fix. The goal is simply to lessen the strength of the shadow areas, so they are not so offensive.
Here's a wedding party photo taken under trees. Most of the subjects escaped the dappled shadows, but this guy on the end was right in harm's way.

For something like this to be fixable, make sure you don't have any channel clipping in the skin! I can't stress this enough. Process the Raw photo a little underexposed if you have to, but just make sure you avoid any skin blowouts.
Subscribe to:
Comments (Atom)
Comments or Questions?
If you have anything to add or ask about this article, please visit me at my Ask Damien page.