Friday, April 23, 2010
Check your monitor's gamut
Once you've calibrated your monitor with a calibration device, you can check its gamut - that is, you can check the range of colour that it displays. You can compare it with the sRGB colour space, or Adobe RGB, or maybe the gamut of another calibrated monitor.
This might sound nerdy, and it is! But it can be interesting, too.
The cool way - in 3D!
If you have a Mac, this is available to you really easily, via the ColorSync Utility. You can view colour profiles in 3D, spin them around, etc. And you can compare the size and shape of two profiles. I've found some info about it here.
Thursday, April 22, 2010
And now for something completely different: Teach yourself handstand!
First, I need to apologise to all the folk who read this blog expecting the odd nugget of Photoshop wisdom. This post couldn't be further from Photoshop!
Second, and more important, I need to apologise to my mate Adam, who has been asking me since before Christmas for advice on teaching himself to do a handstand. Adam, I hope this is worth the wait! And who knows ... maybe somebody else out there would like to learn as well - it's never too late!
Second, and more important, I need to apologise to my mate Adam, who has been asking me since before Christmas for advice on teaching himself to do a handstand. Adam, I hope this is worth the wait! And who knows ... maybe somebody else out there would like to learn as well - it's never too late!
Friday, April 16, 2010
The Actions Palette
There's a real art to making, editing and managing actions, which you'll develop over time. I'd like to give you a brief tour of the palette, and discuss some simple methods of altering and personalising your actions.
(These screenshots have been taken in CS4, but there's very little difference in other versions. None of this applies to Elements, I'm afraid.)
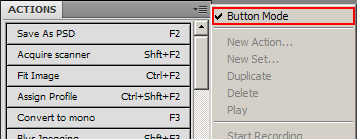
If your Actions palette is in Button Mode, the first thing you need to do is choose the little flyout menu from the top corner, and turn off Button Mode:
 Then you'll see your actions in all their glory, like this:
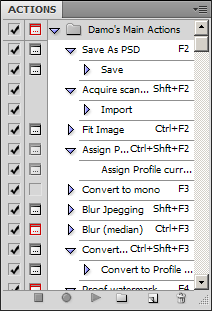
 Then you'll see your actions in all their glory, like this:

Thursday, April 15, 2010
Over-Rated Stuff: The Recovery Slider
Hi, and thanks for tuning in to this edition of Over-Rated Stuff, the show that looks at things that appear useful, but aren't very.
Last week we discussed inflatable dartboards, and this week we turn our attention to the darling of Adobe's raw processing programs, the Recovery Slider.
Watching somebody try to rescue blown highlights with the Recovery Slider is like watching a Hell's Angel biker trying to get drunk on low-alcohol beer. He drinks and drinks and drinks, and barely feels a thing.
Low-alcohol beer is what you politely sip at awkward formal occasions, and there's no chance of dancing the Nutbush with your underwear on your head. If you want to get rolling drunk, you need rum.
The Recovery slider is what you use to fix some tiny little pale areas in your photo. Let's be clear - if you have areas of blowout in your image, it's because of overexposure. And there's another slider that's used to fix exposure - can you guess what it is?
Sunday, April 4, 2010
An analogy
Here's something to ponder ...
If you have room for four passengers in your car, and have four spare tickets to a football game, is there any sense in inviting five of your neighbours to come with you?
Of course not.
Even if you could hide the fifth guy in the boot ("trunk" for my foreign friends) where he couldn't be seen, he wouldn't be able to get in to the game without a ticket anyway.
Now, consider this ...
If your computer screen can display colours no brighter than the sRGB gamut, and your lab can't print colours brighter than the sRGB gamut, is there any sense in processing your images in the Adobe RGB or ProPhoto RGB space?
Of course not.
If you can't see those extra colours, or reproduce them, there's no sense in "inviting" them along in the first place.
Subscribe to:
Posts (Atom)