Thursday, August 27, 2015
Sunday, August 23, 2015
Simple but important reminder
While you're transferring photos from your card to your computer (whether by cable or card reader*), DON'T DO ANYTHING ELSE ON YOUR COMPUTER.

Not only must you avoid any processor-intensive work such as editing, don't even check your emails or browse Facebook. NOTHING. Allow your computer to concentrate solely on the most important task in the world right at that moment - getting your files safely onto your hard drive.
Likewise, when you're backing up your photos to your external drives, or your cloud, or wherever. Those periods of transfer are SO critical. If any interruption causes corruption to your files, you might not find out until much later, after you no longer have the original files to fall back on.
Some of you will think that I'm making an unnecessarily big deal about this. Many of you, in fact, will profess to frequently browsing the web while copying files, and you'll boast that you've never had corruption. That doesn't mean you're smart, or invincible, it means you're LUCKY. And luck always runs out, eventually. When you are mourning the loss of some important photos, believe me, catching up on your friends' news won't seem that important after all.
There's a very important aspect to this which I must discuss. Many times on forums people post that they've found a corrupted file or files in their set. Many other people are very quick to say "Oh, your card is corrupted, get a new one."
I've often wondered how many perfectly good cards have been discarded for no reason. You see, if you find a corrupted file on your computer, there's a very good chance that the corruption happened during the transfer, because you couldn't leave your computer alone for a few minutes. There's a very good chance that the file on the card was perfectly fine.
So in these online discussions, my first question to the poster is always "Do you still have the files on the card?" If we're lucky, they still do; in which case they can try copying them across again, and checking if the corruption is still present. Quite often, I'm pleased to say, it's not. This is a great outcome - we've got the photo back, and a card wasn't victimised and discarded unnecessarily.
But sadly, often the poster has already formatted the card, and used it again. This sucks, because then we don't know, you see? We don't know if the problem was the transfer, or if the card itself is truly faulty. That, of course, means people remain nervous every time they use that card in the future.
So leave your computer alone while files are transferring. Just chill out. Make a cup of tea or something. Don't risk it.
In addition to this, of course observe normal computing common sense. Shut it down or restart it regularly. Keep the hard drive at least 1/3rd empty at all times. And run maintenance software regularly (see the bottom of this page).
*Please don't use a cable. Always a card reader.
Wednesday, August 19, 2015
Fixing tan lines
This is a very easy method to keep in mind for photos like this one, where tan lines are evident:

(This tutorial deals with darkening the too-white areas to match the tan. If you want to lighten the tanned areas, The Handyman Method should work satisfactorily.)
This method works in both Photoshop and Elements. Start by adding a Photo Filter adjustment layer, and increase the Density slider all the way to 100, and turn off "Preserve Luminosity". The default Warming Filter 85 is usually fine as a starting point:

This will make the whole photo look hideously orange, of course, so invert the mask to hide the effect:

Then start painting on the mask with a very low opacity brush, until the skin is as dark as the other skin around it. The colour might not be perfect yet, but that's ok - just concentrate on the darkness:

Here's what my mask looked like for this photo:

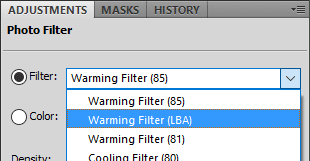
Once the darkness is good, turn your attention to the colour. If Warming Filter (85) doesn't look perfect to you, try changing to each of the other Warming filters. You can also try the Orange one further down the list:
If none of those are perfect either, don't panic. Just choose the "Color" option, and click on the orange square to open the Color Picker:

In the Color Picker, I usually find the H value is most important. I simply click in that field, then use the wheel of my mouse to take the number up or down, while watching the photo. For this photo, I found that a Hue of 24 was identical to the surrounding skin:

(Sometimes it's also necessary to fiddle with the S and B values to get your perfect result.)
Here's my outcome. Pretty good, eh? And so simple. Nobody would ever know.

For really complex situations, it is sometimes necessary to follow the Photo Filter with some additional touch-ups using The Handyman Method. Not very often, though.
Needless to say, if all this talk of layers and masking is foreign to you, I beg you to consider my little Layers & Masks Class. For a tiny fee, it will open up a whole world of editing skills to you.
(This tutorial deals with darkening the too-white areas to match the tan. If you want to lighten the tanned areas, The Handyman Method should work satisfactorily.)
This method works in both Photoshop and Elements. Start by adding a Photo Filter adjustment layer, and increase the Density slider all the way to 100, and turn off "Preserve Luminosity". The default Warming Filter 85 is usually fine as a starting point:
This will make the whole photo look hideously orange, of course, so invert the mask to hide the effect:
Then start painting on the mask with a very low opacity brush, until the skin is as dark as the other skin around it. The colour might not be perfect yet, but that's ok - just concentrate on the darkness:
Here's what my mask looked like for this photo:
Once the darkness is good, turn your attention to the colour. If Warming Filter (85) doesn't look perfect to you, try changing to each of the other Warming filters. You can also try the Orange one further down the list:
If none of those are perfect either, don't panic. Just choose the "Color" option, and click on the orange square to open the Color Picker:
In the Color Picker, I usually find the H value is most important. I simply click in that field, then use the wheel of my mouse to take the number up or down, while watching the photo. For this photo, I found that a Hue of 24 was identical to the surrounding skin:
(Sometimes it's also necessary to fiddle with the S and B values to get your perfect result.)
Here's my outcome. Pretty good, eh? And so simple. Nobody would ever know.
For really complex situations, it is sometimes necessary to follow the Photo Filter with some additional touch-ups using The Handyman Method. Not very often, though.
Needless to say, if all this talk of layers and masking is foreign to you, I beg you to consider my little Layers & Masks Class. For a tiny fee, it will open up a whole world of editing skills to you.
Subscribe to:
Posts (Atom)