One of the reader comments on my previous post about Raw noise removal reminded me of an issue I should have mentioned earlier.
The new generation of DSLRs, such as the Nikon D700 and the Canon 5DMkII, have fantastic ISO capabilities. If you are shooting with one of these, at low ISOs, it's easy to comfortably ignore noise removal, because the images are so "clean".
But I hark back to an important point in my previous post - namely, the awfully high default setting of the Color noise slider.
As I discussed, a too-high setting on that slider will go way beyond fixing colour noise, and begin "fixing" - that is, ruining - good colour in your pixels. That default setting of 25 is outrageously high for a D700 or a 5DII.
So I urge you not to be complacent. Always check the noise situation, and only use as much colour noise removal as is absolutely necessary. In some cases, you'll only require a setting of 2, 1, or even 0.
Saturday, July 31, 2010
Thursday, July 29, 2010
Raw noise removal
One of the golden rules of editing is to do as much in Raw as possible before moving into Photoshop, and noise removal is no exception. Noise must be removed in raw, because if you wait until later, the damage to your file has already been done.
So I'd like to share my approach to the noise removal sliders. This article is written using ACR in Photoshop CS4, but applies to all Adobe software, and should be relevant to other raw software too.
If you've ever dabbled with noise removal (of any sort) you'll know there are two controls for it - Luminance and Color. In ACR, the default values for the sliders are 0 and 25 respectively:
(Note: Newer versions of raw software have additional sliders, but they are largely unnecessary for day-to-day editing. This article will concentrate on these two important main sliders.)
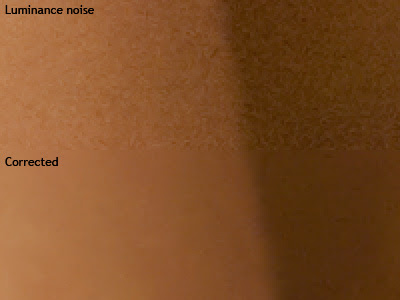
It's important to understand the difference. Luminance noise is what we think of when we usually think of noise - graininess. Here's a close-up example of luminance noise:
So I'd like to share my approach to the noise removal sliders. This article is written using ACR in Photoshop CS4, but applies to all Adobe software, and should be relevant to other raw software too.
If you've ever dabbled with noise removal (of any sort) you'll know there are two controls for it - Luminance and Color. In ACR, the default values for the sliders are 0 and 25 respectively:

(Note: Newer versions of raw software have additional sliders, but they are largely unnecessary for day-to-day editing. This article will concentrate on these two important main sliders.)
It's important to understand the difference. Luminance noise is what we think of when we usually think of noise - graininess. Here's a close-up example of luminance noise:

Sunday, July 11, 2010
Those family snaps
We had a first birthday in our house yesterday (happy birthday Rowan!), and it prompted me to write about the "happy snaps" that we take.
Most of us prefer to work with Raw files for any commercial photographic purposes - you can't go past the quality and flexibility of that wonderful raw data.
But the inescapable fact is that Raw files are big - darn big. So for that reason, it gets a bit cumbersome to store and backup thousands of candid photos of our own kids if they're all in Raw format. Therefore, I've seen many people say that they switch to Jpeg if they're taking everyday snaps around the house.
Wednesday, July 7, 2010
Batch processing in ACR
I've been promising this post for ages - I'm sorry it's taken so long :(
It's dead easy to process multiple files in Adobe Camera Raw. In fact, if you've got a set of images taken consecutively, you'd be nuts not to take advantage of this powerful functionality.
Before I discuss batch processing per se, I just want to mention the simple matter of copying a previous conversion. Let's say you open one image, and make some adjustments. When you open the next image, you can open the little ACR menu (circled in red in the following CS4 screenshot) and choose "Previous Conversion":

Saturday, July 3, 2010
Clarification re: print labs
After having yet another conversation about this, I'm writing this exasperated post ...
Just because your print lab accepts Adobe RGB files, doesn't mean they can print the entire Adobe RGB gamut.
A lot of consumer labs expect sRGB files, and print poorly if you give them something else. But the good labs can accept files in any colour space at all - Adobe RGB, ProPhoto RGB, etc.
Does this mean they can print any colour in the world? Of course not. It just means that they have an excellent colour-management workflow in place, and will convert your images to their print space before printing.
If you provide them with colours that are too bright for print, they'll be clipped, and won't print properly. Logical, right? But a lot of people seem to think that if their lab accepts Adobe RGB files, then they must be able to print the whole gamut. Not so, I'm afraid.
But here's the good news. If your lab is good enough to be able to accept any colour spaces, it stands to reason that they're also good enough to provide soft-proofing profiles. Check your lab's website for their print profiles, then soft-proof your images to see if any colours are at risk of clipping.
For more information, see my Soft-proofing tutorial
Subscribe to:
Posts (Atom)