There's a real art to making, editing and managing actions, which you'll develop over time. I'd like to give you a brief tour of the palette, and discuss some simple methods of altering and personalising your actions.
(These screenshots have been taken in CS4, but there's very little difference in other versions. None of this applies to Elements, I'm afraid.)
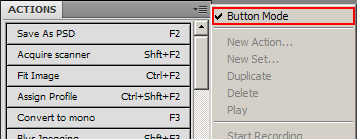
If your Actions palette is in Button Mode, the first thing you need to do is choose the little flyout menu from the top corner, and turn off Button Mode:
Then you'll see your actions in all their glory, like this:
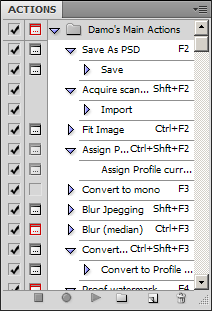
First, we'll take a look at the bottom of the palette. No particular surprises here - Stop, Record, Play, New Set, New Action, Trash, in that order:

All actions have to exist in Sets. You can't create a new action without creating a new set first, or choosing an existing set in which it can reside. The sets are what you save to your hard drive.
Don't forget to save any action sets you make, because Photoshop won't save them for you. Many folk have been caught out by a Photoshop crash which has obliterated their unsaved actions.
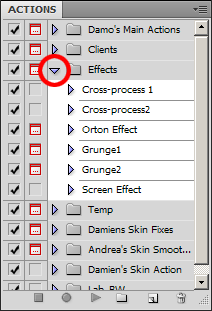
Here you can see the various sets of actions in my palette. I've clicked on the little arrow to open up the set called "Effects" to see the six actions that live inside it:
Now I've opened up one of the actions to see the steps within it:
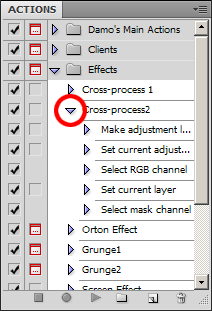
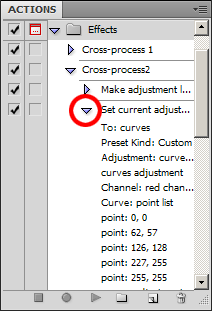
And now I've opened up one of the steps to see the settings used. You can see this was a Curves adjustment on the Red channel:
Ok, let's talk about those columns down the left hand side. The first column is full of ticks, and those ticks are always on, unless you deliberately turn them off. A tick means that that step will be included when the action is played.
If you'd like to run an action without a certain step, you could completely delete the step using the little Trash Can down the bottom, but that might be a bit too permanent for your taste. You can simply turn off the tick for that step, and every time you run the action, that step will be ignored, until you turn it back on.
In this example, I've turned off the "Select mask channel" step at the end of this action:
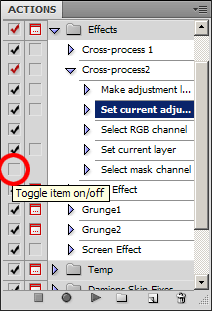
Notice in the above illustration that immediately I turned off one of the individual ticks in the action, the tick for the action itself turned red. The red tick is there to tell you at a glance if anything is turned off within the action - quite handy.
Ok, now for the second column - those tiny little square dialog box icons. This is the column that you
really need to know about. Where you see one of those little black box icons, it means that the action will stop at that point to allow you to manually adjust whatever it is.
Remember that Curves step that adjusted the Red channel? Well, without a little black box icon, it just does its thing and moves on. But if I add a little black box icon, it will do its thing, and then stop to allow me to tweak it some more. Then when I press "Ok" on the Curves dialog, the action continues running:
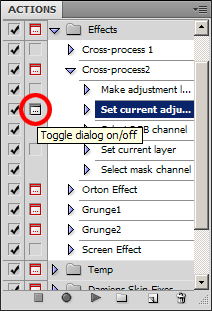
In the above illustration, note the little red box icon that appears beside the name of the action. Once again, the red icon denotes that there is something happening with one of the steps inside. You'll notice that a lot of my actions have red box icons beside them, because I like to manually intervene quite often!
I hope I've explained this column well enough, because it's critical if you want to take exquisite control of your actions. The ability to tell your action to "Stop here while I adjust it myself" is very powerful.
Ok, what else can we do? Well, you can add extra steps in your action. Make sure you have a suitable image open, then click on a step in the action, then press the little round Record button to record a new step immediately after the selected step.
In this example, I'm going to record a new step just after the "Select RGB channel" step:
 Don't forget to press Stop
 (the square button) after you've recorded the new step! I can't tell you how many times I've recorded a step, then forgotten to press Stop, and look back five minutes later to see it's faithfully recorded everything I've done since! Very embarrassing :(
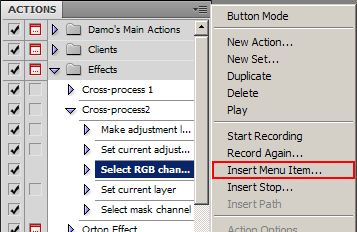
Another way to add a new step is to choose the spot in the action, then choose "Insert Menu Item" from the flyout menu. This allows you to choose a menu item (eg View > Actual Pixels) to pop in there:
Or, you can choose a step and re-record it. In this example, if I decided that I didn't like that "Select RGB channel" step, and I wanted to select the Green channel instead, I could just choose that step, then choose "Record Again" from the flyout menu. (Make sure you have a suitable image open to do this):

That's about all I can think to tell you at the moment. There could be dozens of reasons why you'd want to alter your actions, and each reason will require a different method. I can't possibly discuss all the different scenarios here, but I hope this helps a little.
 Then you'll see your actions in all their glory, like this:
 First, we'll take a look at the bottom of the palette. No particular surprises here - Stop, Record, Play, New Set, New Action, Trash, in that order:
 All actions have to exist in Sets. You can't create a new action without creating a new set first, or choosing an existing set in which it can reside. The sets are what you save to your hard drive. Don't forget to save any action sets you make, because Photoshop won't save them for you. Many folk have been caught out by a Photoshop crash which has obliterated their unsaved actions.
Here you can see the various sets of actions in my palette. I've clicked on the little arrow to open up the set called "Effects" to see the six actions that live inside it:
All actions have to exist in Sets. You can't create a new action without creating a new set first, or choosing an existing set in which it can reside. The sets are what you save to your hard drive. Don't forget to save any action sets you make, because Photoshop won't save them for you. Many folk have been caught out by a Photoshop crash which has obliterated their unsaved actions.
Here you can see the various sets of actions in my palette. I've clicked on the little arrow to open up the set called "Effects" to see the six actions that live inside it:
 Now I've opened up one of the actions to see the steps within it:
 And now I've opened up one of the steps to see the settings used. You can see this was a Curves adjustment on the Red channel:
 Ok, let's talk about those columns down the left hand side. The first column is full of ticks, and those ticks are always on, unless you deliberately turn them off. A tick means that that step will be included when the action is played.
If you'd like to run an action without a certain step, you could completely delete the step using the little Trash Can down the bottom, but that might be a bit too permanent for your taste. You can simply turn off the tick for that step, and every time you run the action, that step will be ignored, until you turn it back on.
In this example, I've turned off the "Select mask channel" step at the end of this action:
Ok, let's talk about those columns down the left hand side. The first column is full of ticks, and those ticks are always on, unless you deliberately turn them off. A tick means that that step will be included when the action is played.
If you'd like to run an action without a certain step, you could completely delete the step using the little Trash Can down the bottom, but that might be a bit too permanent for your taste. You can simply turn off the tick for that step, and every time you run the action, that step will be ignored, until you turn it back on.
In this example, I've turned off the "Select mask channel" step at the end of this action:
 Notice in the above illustration that immediately I turned off one of the individual ticks in the action, the tick for the action itself turned red. The red tick is there to tell you at a glance if anything is turned off within the action - quite handy.
Ok, now for the second column - those tiny little square dialog box icons. This is the column that you really need to know about. Where you see one of those little black box icons, it means that the action will stop at that point to allow you to manually adjust whatever it is.
Remember that Curves step that adjusted the Red channel? Well, without a little black box icon, it just does its thing and moves on. But if I add a little black box icon, it will do its thing, and then stop to allow me to tweak it some more. Then when I press "Ok" on the Curves dialog, the action continues running:
Notice in the above illustration that immediately I turned off one of the individual ticks in the action, the tick for the action itself turned red. The red tick is there to tell you at a glance if anything is turned off within the action - quite handy.
Ok, now for the second column - those tiny little square dialog box icons. This is the column that you really need to know about. Where you see one of those little black box icons, it means that the action will stop at that point to allow you to manually adjust whatever it is.
Remember that Curves step that adjusted the Red channel? Well, without a little black box icon, it just does its thing and moves on. But if I add a little black box icon, it will do its thing, and then stop to allow me to tweak it some more. Then when I press "Ok" on the Curves dialog, the action continues running:
 In the above illustration, note the little red box icon that appears beside the name of the action. Once again, the red icon denotes that there is something happening with one of the steps inside. You'll notice that a lot of my actions have red box icons beside them, because I like to manually intervene quite often!
I hope I've explained this column well enough, because it's critical if you want to take exquisite control of your actions. The ability to tell your action to "Stop here while I adjust it myself" is very powerful.
Ok, what else can we do? Well, you can add extra steps in your action. Make sure you have a suitable image open, then click on a step in the action, then press the little round Record button to record a new step immediately after the selected step.
In this example, I'm going to record a new step just after the "Select RGB channel" step:
In the above illustration, note the little red box icon that appears beside the name of the action. Once again, the red icon denotes that there is something happening with one of the steps inside. You'll notice that a lot of my actions have red box icons beside them, because I like to manually intervene quite often!
I hope I've explained this column well enough, because it's critical if you want to take exquisite control of your actions. The ability to tell your action to "Stop here while I adjust it myself" is very powerful.
Ok, what else can we do? Well, you can add extra steps in your action. Make sure you have a suitable image open, then click on a step in the action, then press the little round Record button to record a new step immediately after the selected step.
In this example, I'm going to record a new step just after the "Select RGB channel" step:
 Don't forget to press Stop (the square button) after you've recorded the new step! I can't tell you how many times I've recorded a step, then forgotten to press Stop, and look back five minutes later to see it's faithfully recorded everything I've done since! Very embarrassing :(
Another way to add a new step is to choose the spot in the action, then choose "Insert Menu Item" from the flyout menu. This allows you to choose a menu item (eg View > Actual Pixels) to pop in there:
Don't forget to press Stop (the square button) after you've recorded the new step! I can't tell you how many times I've recorded a step, then forgotten to press Stop, and look back five minutes later to see it's faithfully recorded everything I've done since! Very embarrassing :(
Another way to add a new step is to choose the spot in the action, then choose "Insert Menu Item" from the flyout menu. This allows you to choose a menu item (eg View > Actual Pixels) to pop in there:
 Or, you can choose a step and re-record it. In this example, if I decided that I didn't like that "Select RGB channel" step, and I wanted to select the Green channel instead, I could just choose that step, then choose "Record Again" from the flyout menu. (Make sure you have a suitable image open to do this):
 That's about all I can think to tell you at the moment. There could be dozens of reasons why you'd want to alter your actions, and each reason will require a different method. I can't possibly discuss all the different scenarios here, but I hope this helps a little.