I've been promising this post for ages - I'm sorry it's taken so long :(
It's dead easy to process multiple files in Adobe Camera Raw. In fact, if you've got a set of images taken consecutively, you'd be nuts not to take advantage of this powerful functionality.
Before I discuss batch processing per se, I just want to mention the simple matter of copying a previous conversion. Let's say you open one image, and make some adjustments. When you open the next image, you can open the little ACR menu (circled in red in the following CS4 screenshot) and choose "Previous Conversion":
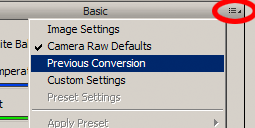
That applies the preceding settings to the new image. It's certainly not a solution for whole sets of images, but is a handy trick to have up your sleeve from time to time.
Ok, let's talk about proper batch processing.
Open up a whole bunch of similar photos. It's easiest to do this via Bridge, but it doesn't matter if you don't use Bridge - you can simply drag-and-drop a group of images into Photoshop. The number of images you can open seems to be limited only by the power of your computer - I've seen some people mention that they can open up to 100 at a time! My slightly aging computer can't handle that many, I'm afraid.
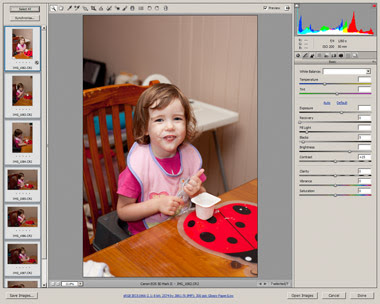
The ACR interface that you're familiar with will now have a column of thumbnails down the left side. Select the image that you want to be your "master" image. Often it will be the first image in the set (as I've indicated below), but it doesn't have to be. Choose the image that you think best represents the entire set:
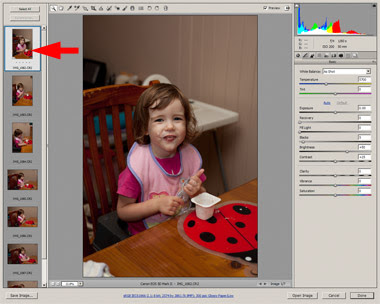
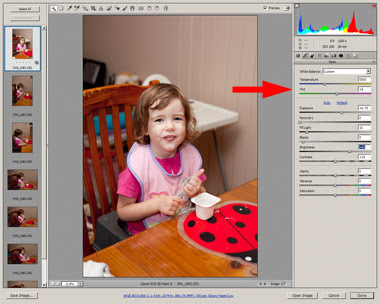
Edit your "master" image in the normal way - white balance, exposure, etc:
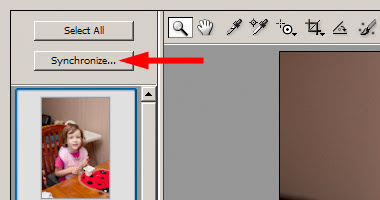
Then press the "Select All" button ...
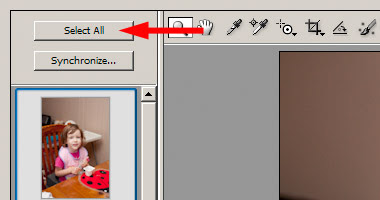
... to highlight all of the images:
Then press the "Synchronize" button:
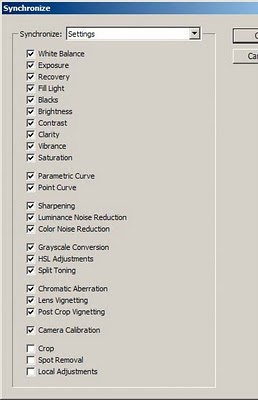
The Synchronize window allows you to choose which settings from the "master" image you wish to replicate to all the others. I usually use the standard settings - ie, everything except the last three options:
Voila! Your adjustments are applied to the whole set:
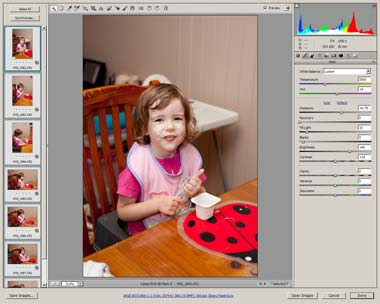
If you're confident that all your images match perfectly to the "master" image, then you can finish your raw processing (by pressing "Done" or "Open Images" or "Save Images"). But it's not a bad idea to take a moment to check each image, and make any slight adjustments if required, before finishing up.
I should mention that it's also possible to do things the other way around. You can choose your master image, then immediately press "Select All" and "Synchronize", then make the adjustments to all the images at once. Whether you synchronize at the beginning or the end is just a matter of personal preference, as far as I can tell.
 That applies the preceding settings to the new image. It's certainly not a solution for whole sets of images, but is a handy trick to have up your sleeve from time to time.
Ok, let's talk about proper batch processing.
Open up a whole bunch of similar photos. It's easiest to do this via Bridge, but it doesn't matter if you don't use Bridge - you can simply drag-and-drop a group of images into Photoshop. The number of images you can open seems to be limited only by the power of your computer - I've seen some people mention that they can open up to 100 at a time! My slightly aging computer can't handle that many, I'm afraid.
The ACR interface that you're familiar with will now have a column of thumbnails down the left side. Select the image that you want to be your "master" image. Often it will be the first image in the set (as I've indicated below), but it doesn't have to be. Choose the image that you think best represents the entire set:
That applies the preceding settings to the new image. It's certainly not a solution for whole sets of images, but is a handy trick to have up your sleeve from time to time.
Ok, let's talk about proper batch processing.
Open up a whole bunch of similar photos. It's easiest to do this via Bridge, but it doesn't matter if you don't use Bridge - you can simply drag-and-drop a group of images into Photoshop. The number of images you can open seems to be limited only by the power of your computer - I've seen some people mention that they can open up to 100 at a time! My slightly aging computer can't handle that many, I'm afraid.
The ACR interface that you're familiar with will now have a column of thumbnails down the left side. Select the image that you want to be your "master" image. Often it will be the first image in the set (as I've indicated below), but it doesn't have to be. Choose the image that you think best represents the entire set:
 Edit your "master" image in the normal way - white balance, exposure, etc:
 Then press the "Select All" button ...
 ... to highlight all of the images:
 Then press the "Synchronize" button:
 The Synchronize window allows you to choose which settings from the "master" image you wish to replicate to all the others. I usually use the standard settings - ie, everything except the last three options:
 Voila! Your adjustments are applied to the whole set:
 If you're confident that all your images match perfectly to the "master" image, then you can finish your raw processing (by pressing "Done" or "Open Images" or "Save Images"). But it's not a bad idea to take a moment to check each image, and make any slight adjustments if required, before finishing up.
I should mention that it's also possible to do things the other way around. You can choose your master image, then immediately press "Select All" and "Synchronize", then make the adjustments to all the images at once. Whether you synchronize at the beginning or the end is just a matter of personal preference, as far as I can tell.
If you're confident that all your images match perfectly to the "master" image, then you can finish your raw processing (by pressing "Done" or "Open Images" or "Save Images"). But it's not a bad idea to take a moment to check each image, and make any slight adjustments if required, before finishing up.
I should mention that it's also possible to do things the other way around. You can choose your master image, then immediately press "Select All" and "Synchronize", then make the adjustments to all the images at once. Whether you synchronize at the beginning or the end is just a matter of personal preference, as far as I can tell.