Monday, May 7, 2012

Create your own wall guides

Thanks to Crystal for asking this great question.

Recently I wrote a tutorial about preparing an image for canvas printing.  But before you prepare it, you've got to choose it, and its size.  The latter is really important - it's easy to think that a print size (eg 20x30") is really big, but in fact it's very small once it's on your wall.

So, the best way to choose a photo and an appropriate size is to see it on your wall first.  And it's very easy to do.  First, take a photo of the wall on which you'd like to hang the print.  Here's an example wall:


To make it simple for yourself, don't photograph the wall at an angle.  Stand perpendicular to it to take the shot.  This tutorial can be adapted (sort of) for an angled photo, but it won't be as easy, or as accurate.

Saturday, April 14, 2012

Cloning in the workflow

All editing can loosely be divided into two categories.  In one category are colour and tonal adjustments, using Curves or Levels or Hue/Saturation or Photo Filters or whatever.  These edits change the appearance of the pixels in the image, and are done with adjustment layers and masks.

In the other category are pixel edits.  These edits actually change the pixels themselves (by moving or copying or blurring or hiding them), and can't be done using adjustment layers - they must be performed directly to the pixels.

In this "pixel editing" category, we find:
  • Noise reduction
  • Liquifying
  • Skin smoothing
  • Cloning
  • Healing

Thursday, March 22, 2012

Opacity shortcuts

There are about a bazillion keyboard shortcuts in Photoshop and Elements, and you can't learn them all at once.

At first, focus your attention on the most important ones in the toolbar - C for the Crop Tool, B for the Brush Tool, V for the Move Tool, etc.  Those are the ones that you'll use frequently, and therefore they'll save you the most time.

Once you've mastered those, you should aim to gradually add more shortcuts to your subconscious arsenal.  Every time you can press a key instead of moving your mouse to a tool/menu/slider, you've saved yourself a second or two.  And even though a second or two doesn't seem like much, a lot of little time savings can seriously add up to a faster workflow.

I want to tell you about the keyboard shortcuts that have saved me the most time - brush opacity.

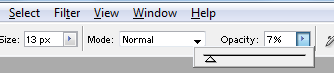
Changing the opacity of your brush is a tedious thing to do with the mouse.  It's not just one click, it's two or three.  You have to reach up to the toolbar, click for the slider to appear, then slide it; or click to highlight the numeric value, then type a new one in.  Seconds wasted!


Embrace the shortcuts, my friends.  They're staggeringly simple - just press 1 for 10%, 2 for 20%, 3 for 30% etc.  That's all!  Just a single keystroke will change the brush opacity, and you barely have to pause painting to do it.

Most importantly, press 0 to put it back to 100%.

If you want a more precise value, type two digits.  Type 25 for 25%, or 03 for 3%, etc.

Try it and see!  It's great.  It also works for the Clone Tool, and other brush-related tools.

Word of warning, though.  If you happen to have a non-brush-related tool selected (such as the Move Tool, or the Crop Tool, or whatever), and you press a number, it'll change the opacity of the layer instead.  Watch out for that little trap - it's caught me many times!

Tuesday, March 20, 2012

Dealing with "hot" areas of skin

This is a very simple tutorial that I've been meaning to write for ages.

Many thanks to Nicole of Essence of the Soul Photography for allowing me to use this beautiful photo:


So gorgeous!  But it has a little problem that seems to pop up in quite a lot of photos ... it has some areas of very "hot" skin - that is, the skin is glowing quite bright red in some parts:


This problem almost always occurs in shadowy areas of skin.  Sometimes it's caused by a red cast - perhaps the subject is wearing a red shirt, or standing beside a red car, or whatever.

Friday, March 2, 2012

Jpegs in ACR (Elements)

I don't know why it's taken me so long to write this simple post!

Photoshop Elements has been able to open Jpegs in Camera Raw for quite a few versions now (since V6, maybe?).  It's very easy to do, as I'll show you.

First, let me reiterate - I can take my cat to a zoo, but that doesn't make it a tiger!  Likewise, you can open Jpegs in a Raw program, but that doesn't make them Raw files!  Editing a Jpeg in ACR is fun, but it's still a Jpeg.  If you want real control and flexibility when editing, shoot Raw.  [/rant]

First, go to File>Open As:


At the bottom, change the format to "Camera Raw":


Choose your image, and press "Open":


Voila!  There it is in ACR:


Do your editing, then press "Open Image" to bring it into Elements for further work.

Monday, February 20, 2012

More about storyboards: intersecting shapes

They say that the squeaky wheel gets the grease, so David, here's your new tutorial :)

David would like to know about creating storyboard designs using intersecting shapes.  Here's the layout I'll demonstrate for this article:


It's very easy.  It just requires a bit of planning (as usual) and careful utilisation of these important little buttons:


(Note: If you're new to storyboards design, this article is not the right place to start.  First, you must read this tutorial, then this one.)

Sunday, February 5, 2012

The Camera Calibration tab in ACR

If you own an X-Rite ColorChecker Passport, or a similar tool, you can create your own custom colour profile for your camera's Raw files.  I'm not a photographer, so I've never done this (nor would I even if I was, probably), so I can't discuss that.

But what I can discuss is the range of canned profiles that come with Adobe Camera Raw.  You find them in the "Camera Calibration" tab.

In Elements, it looks like this:

Saturday, February 4, 2012

What is XMP data all about?

XMP data is the data that Adobe software (ACR and LR) creates to store the editing that you do to a Raw file.  The truth is, we really don't need to think about XMP data at all - it just does its thing in the background, and we get on with our lives.  But it confuses some people, especially when they see those little XMP files in their folders, so let me explain a bit more.

It's very important to understand that Raw files themselves are absolutely, impenetrably, rock-solidly, unchangeable.  You can't modify a raw file, no matter what you try.  The ones and zeros of Raw data that come out of your camera will never be altered.

So, when you're editing a Raw file, you're not actually changing the file itself.  Rather, you're making cosmetic changes to its appearance - much the same as dressing yourself.  You might be dressing in work clothes, or casual clothes, or gardening clothes; but underneath, your body is the same.  Your external appearance is being modified by your garments, that's all.

So it is with Raw files.  You might "dress" a Raw file with a warmer white balance, or reduced exposure, or whatever.  But underneath, it's still exactly the same Raw data, and therefore it's as easy as pie to "undress" it again later if you wish to start your editing all over (more about this later).

Friday, February 3, 2012

To DNG, or not to DNG

People sometimes ask me "Should I convert my Raw files to the DNG format?"  I honestly don't know.

Well, let's clarify - some people have no choice.  If their Adobe software is older than their camera, then the only way they can open their Raw files is to convert them.  No ambiguity there.  (More info)

But lots of other people have Photoshop or Lightroom as new or newer than their camera, so they can open their NEFs, or CR2s, or ORFs, etc, just fine.  For those people, conversion to DNG becomes a matter of choice.

Plenty of people much smarter than me recommend DNG conversion.  It's the generic raw format, and it's meant to be "future-proof", so that you'll be able to open and edit your files forever, regardless of software evolutions over the coming years.  Please don't ask me for an opinion about that, because I don't have one, nor enough knowledge to form one.

Other people convert to DNG because the files are slightly smaller, and the disk space saving is worth it.  That sounds sensible.

But despite all of that, I don't convert to DNG format.  Why?  Because I love XMP files!

Thursday, February 2, 2012

View your filename extensions, Windows peeps!

Occasionally - well, surprisingly frequently, actually - somebody will come to me with laments like this:

"I saved my photo, and now I can't re-open it!"

"My image files have no thumbnails!"


etc.

If the person is a Windows user, the reason for the problems is often that the file has been saved without the filename extension - ".jpg" or ".psd" or whatever.

Windows need filename extensions.  If it doesn't see the "dot-something" after the name, it has no idea what program to associate it with; and therefore can't preview it, or open it.  I'm not sure what causes files to be saved without their extensions.  It just seems to happen sometimes.  Very annoying.

What's more annoying is that Windows, by default, hides all filename extensions.  I wish I knew which genius at Microsoft decided this was a good idea, because I'd like to punch him in the nose.  When all extensions are hidden, you can't see at a glance if any filenames don't have an extension at all.

So, I urge you to follow these steps and make your filename extensions visible.

Comments or Questions?

If you have anything to add or ask about this article, please visit me at my Ask Damien page.